Showing posts with label Crafts. Show all posts

Tuesday, September 13, 2011

All Things Scissors


The number one crafting item at our house these days (and many days before that!) is scissors. Our three-year-old, who is wonderfully responsible with these, will cut just about anything! And fortunately, she is quite good at asking for permission prior to cutting something new, so I am thankful to report that, to date, we have avoided any serious mishaps. With a snip here and a snip there, she will add her special touch on anything from paper and plastic to cardboard and thread. And as she has been quite diligent about her habit these days, I have observed how her fine motor abilities have really increased in this area.

If you have any young children who are ready for some fun with scissors,
you might consider a few things that we have learned along the way:

Provide a pair of child's scissors that are appropriate for her hand size and are a comfortable fit when considering her hand preference.

Make the scissors readily available if you think your child is ready for this step. Right now, we have her scissors in a decorative pail that we keep either at her easel or in her play area in the kitchen. This would also be a good time to lay some ground rules for the use of scissors.

Rotating Wood Scissor Organizer With 18 Assorted Kraft Edger ScissorsProvide a variety of scissors. I purchased a number of Fiskars scissors years ago, but I noticed that a number of sets are available on Amazon, such as these Kraft Edger scissors sold by Wayfair. Our little one has such fun trimming the edges of her crafts with a variety of decorative edges!

Provide plenty of material for cutting. Try to think outside the box on this one. A stack of white paper is not terribly exciting, but a small assortment of colored sheets is much more interesting! Also, try writing things on some of the papers for your little one, or draw interesting lines and shapes for them to cut out. And, of course, you can prepare a craft ahead of time that would allow for more structured cutting.

Offer some instruction on cutting, but try to allow for a little room to get comfortable with these new crafting tools in their hands. They may not do it perfectly at first, but they'll get better with lots of fun practice!

Enlist the help of your little one as soon as you think they can safely cut things for you. For instance, tonight I left a new puzzle for our little ones to discover in the morning. Instead of removing the packaging, as I would normally have done, I left it on there and will let her open it for us!

Encourage your little one to clean up after herself. This is a tricky one. I definitely think that little ones need to learn to clean up after themselves, but if you have had any experience with a budding scissor user, then you know that tiny little scraps will end up all over your kitchen floor! I encourage her to clean as it's appropriate, but I definitely help out with this one. I want to make sure to encourage her craftiness, not to discourage it by making her do more than she's able. We have also started keeping a scrap box nearby to aid in clean-up. 

And needless to say, make sure to supervise your little one . Safety (and the avoidance of a hair styling mishap) comes first!

Monday, August 29, 2011

Paper Shapers

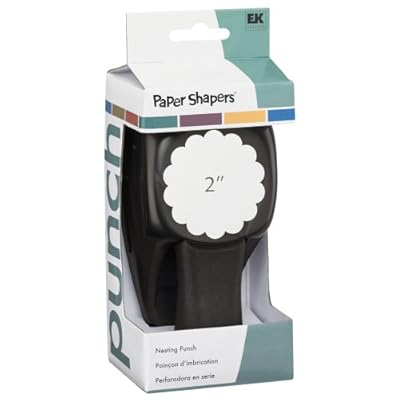
I mentioned in my previous post that Etsy is my new favorite online shopping site--what a gem to find such special handmade treasures! Well, I must say that after our little one's birthday party, I added a new favorite to my collection of crafting supplies as well! The Paper Shapers Scallop Circle Nesting Punch was perfect for making these lovely tags designed by Latoya at Paper Party Passion (PaperPartyPassion.etsy.com)! I enjoyed hanging the tags from balloons, tying them to the party favor bags, and attaching them to the children's honey bear bottles (for drinks, no less, as this was a party with bees as its highlight!).

While I certainly hope to use this lovely new crafting tool to make perfectly scalloped party tags again, I thought this would be useful at any time of the year for a variety of crafting projects. Maybe I'll have a picture or two down the road to accompany this list, but for now, here are a few ideas:

Memory Matching Game
By punching out a small number of tags from cardstock, you can easily add pairs of matching stickers for a homemade memory activity. Try a twist on the original idea of identical pictures and create "pairs" using opposite items, upper- and lower-case letters, or related items (such as socks and shoes or bread and butter).
Seasonal Craft Projects
These tags would be wonderful as a bouquet of spring flowers. Try punching them out, adding pipe cleaners, and placing them in a flower pot for a lovely seasonal activity!
Stencils for Painting
Instead of tossing the border that is left behind after punching out your tags, use them as stencils. Tape them to a piece of paper, and let your little one fill them in with paint.
Gift Tags
What an economical and fun way to add a personal touch to your holiday or birthday gifts! Try attaching them to a gift with a cute piece of ribbon.
Cupcake Decorating
Try placing the outer border that remains after punching out your gift tag over a cupcake and sprinkle with powdered sugar or cocoa. Then carefully remove the border, and you have a delightfully embellished confection!

Friday, August 26, 2011

Happy Birthday Precious!

 
To our dear little girl...
I love you so much, our dear little one. Please pardon my delay in writing this post just for you, but I cannot help but share a few things before another year quickly passes by. You are growing so much, and I'm afraid my attempts to keep you small are to no avail. I'm so proud of you. Your sweet spirit is so lovely, and your love for God and His Word even at this young age encourage me so much. Thank you for being our oldest little baby. We love you, and we cherish you. I'm afraid words cannot fully describe every little joy I have with you, every moment I have cherished, every time I have kissed your sweet, soft little cheek, lingering just an extra moment to savor the sweetness of you., how my heart skips a beat now and then out of delight for your sweet little whims. How I have tried to write down so many special memories, and then with the rest, I try to cherish them in my heart. You are truly a joy. Thank you for being who you are. God has certainly blessed Mommy and Daddy in that we have the privilege of loving you.

And to the rest...
We had such fun celebrating her birthday this year! It is truly to my delight that I have the blessing of planning another party for one of our little ones! Perhaps it is just one of the sweetest joys of motherhood to me... the planning, the cutting, the sewing, the gluing, the baking, the writing, the endless pondering of the little details for an upcoming birthday... I just love it! We had such a fun time celebrating with bumblebees upon bumblebees! But perhaps one of the greatest joys of all was that we were able to just enjoy her on her actual birthday, with fun festivities the day after! What fun we had playing with new horseback riding accessories from Grandma in the "round booth" at one of our favorite little restaurants... and seeing the delight in her expression later when she wore a sombrero at our favorite Mexican eatery--truly sweet! Perhaps that is one of the greatest lessons learned on my part: regardless of the number of things that seem to be endlessly adding themselves to my to-do list around the time of a birthday, simply setting those things aside--even at the expense of much-needed sleep--is worth it to me just to be able to enjoy these beloved babies of ours!

And a note or two regarding my new favorite online store... Etsy!
I just love it! I hope to have more on the details of a thing or two about the party coming up, but for now, I want to make sure to credit the designers who made a couple of the lovely items in the pictures noted above. Latoya from Paper Party Passion(PaperPartyPassion.etsy.com) made some lovely bumblebee templates (at a wonderfully economical price!) that I used for the gift and drink tags pictured above, as well as for her invitations and birthday banner. A template for folding cards also came with this order. And the beautiful bumblebee birthday clips that we used as party favors were made by Kelly at All Things Girly (http://www.etsy.com/people/AllThingsGirly?ref=pr_profile). These were just adorable!

Happy birthday to our little bumblebee!